Managing Your Account Security and Password or Two-Factor Authentication (2FA)
Maintaining the security of your Calpace account is essential for protecting your business and client data. The Security & Password section provides you with the tools to manage your login credentials and add enhanced layers of protection to your account.
This guide provides a detailed walkthrough of how to change your password and enable or disable Two-Factor Authentication (2FA).
1. Accessing Your Security Settings
To begin, navigate to the Security & Password page within your account settings.
- From the main dashboard, click on Settings in the left-hand navigation menu.
- In the "Account Settings" menu, select the Security & Password tab.

2. How to Change Your Password
Regularly updating your password is a fundamental security practice.
Step-by-step instructions:
Click the Change Password button to save your new credentials.
Locate the Change Password section at the top of the page.
Current Password: Enter your existing password in the first field to verify your identity.
New Password: Enter your new, desired password. For maximum security, we recommend creating a strong password that is at least 12 characters long and includes a unique combination of uppercase letters, lowercase letters, numbers, and symbols.
Confirm New Password: Re-enter your new password in the final field.

3. How to Enable Two-Factor Authentication (2FA)
Two-Factor Authentication adds a critical second layer of security to your account. When enabled, logging in will require both your password and a time-sensitive code from an authenticator app on your phone. This ensures that even if someone were to compromise your password, they would still be unable to access your account.
Step-by-step instructions to enable 2FA:
- In the "Two-Factor Authentication (2FA)" section, click the Enable 2FA button.
- Scan the QR Code. On the setup screen, open an authenticator application on your smartphone (such as Google Authenticator, Microsoft Authenticator, or Authy) and use it to scan the provided QR code.
- If you cannot scan the code, click the "Can't scan? Enter code manually" link to get a text-based key.

- Enter the Verification Code. Your authenticator app will now generate a 6-digit code. Enter this code into the verification field in Calpace and click the Verify & Enable button.
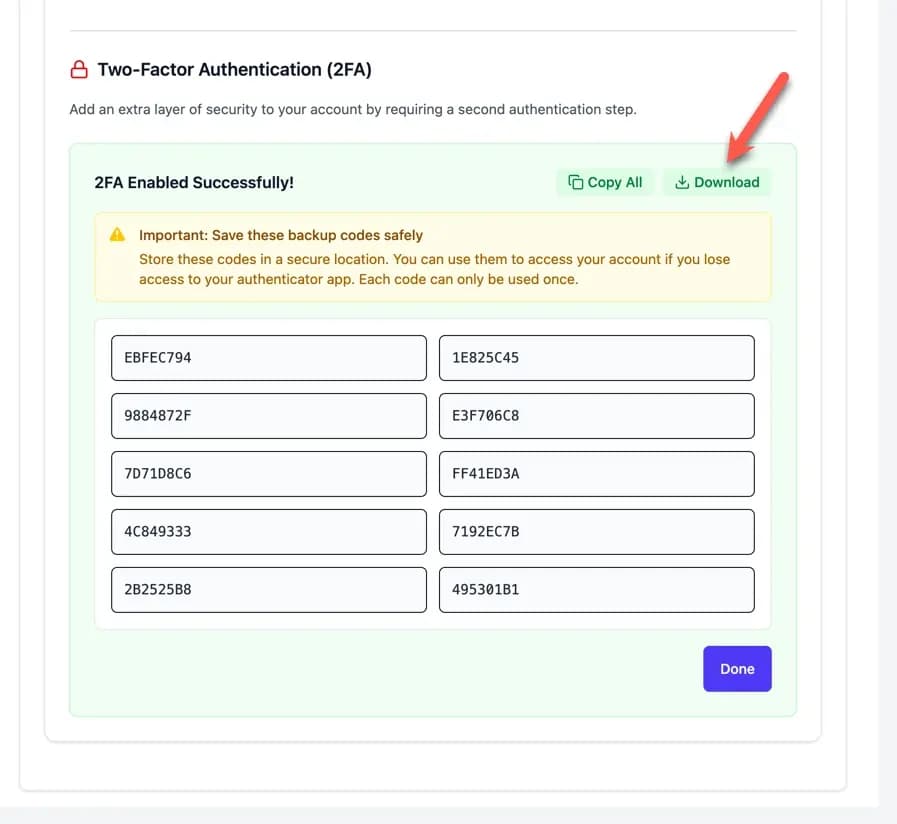
- Save Your Backup Codes. Upon successful verification, you will see the "2FA Enabled Successfully!" screen and a list of ten single-use backup codes.
- This is a critical step. These codes are the only way to access your account if you lose your phone or cannot access your authenticator app.
- Store these codes in a very safe and secure location (such as a password manager or a secure physical document). You can use the Copy All or Download buttons.
- Once you have safely stored your codes, click the Done button.
Confirmation. You will be returned to the Security & Password page. The 2FA section will now show a green confirmation message: "2FA is enabled on your account."

4. How to Disable Two-Factor Authentication
If you need to disable 2FA, you can do so from the same page.
- Navigate to
Settings > Security & Password. - In the Two-Factor Authentication section, click the Disable button.
- You will be prompted to enter your password and likely a final 2FA code to confirm the action. Follow the on-screen instructions to complete the process.